Finding new crafts is always a delight, so when Nana suggested a book folding fairy house craft, we simply couldn’t resist!
This is not a craft for very little children, but the older they are, the more they can do. For our fairy houses, Nana folded the pages first. Children would be able to do this themselves, depending on age, but it can take a little time. We also did book folding a guinea pig, which BB (age 7) did himself, so children can manage it.
You need
- A paperback book (the more pages there are the fuller the house, but the longer it will take to fold)
- Scissors
- Glue (you need a strong glue or a hot glue gun)
- Circle of cardboard
- Paint
- Paper/card
- Pens
Method
- Fold alternate pages. For the first page, fold the top corner down to the middle of the book, then fold the bottom corner up to make a triangle.
- For the second page, fold the top corner down again, then fold the bottom corner across to the middle.
- Continue folding the pages alternately until you have folded the whole book.
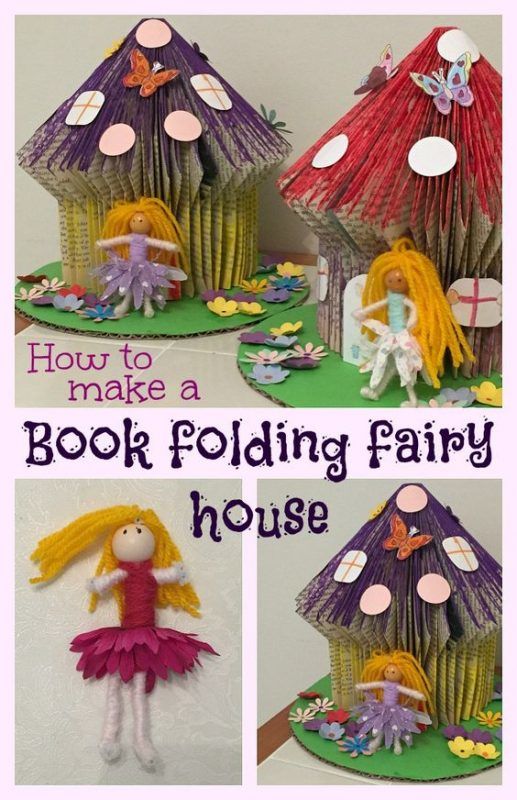
- Remove the cover of the book by cutting it. Glue the first and last pages together to make the round toadstool shape.
- Glue the fairy book onto a round piece of cardboard. We stuck green paper onto the cardboard first to make it look like grass.
- Paint you fairy house.
- Cut out shapes of paper or card for the door, windows etc and decorate according to your own imagination.
Pinky and Boo really enjoyed painting and decorating their fairy house. They loved thinking about the design. Pinky was desperate to add white dots to her roof, just like a toadstool would have.
Once the fairy houses are made, it wouldn’t be complete without a fairy to go in it would it?
To make a fairy you need:
- Wool
- Long pipe cleaner
- 1 Bead for the head
- Material
- Scissors
- Glue
- Pen
Method
- Wind some wool around your hand to make the hair.
- Bend the pipe cleaner in half and poke the end through the middle of the wool.
- Thread the bead through open end of pipe cleaner.
- Bend the pipe cleaner to make arms, body and legs.
- Wind pink wool round the pipe cleaner fairy.
- You may like to use a different colour for the body to look like clothes.
- Cut a circle of material and fringe the edges to make a fairy skirt.
- Cut a hole in the centre of the material and thread the fairy’s legs through to make the skirt.
- Trim the fairy’s hair.
- Mark eyes with a pen.
These fairies are so cute to go with their fairy house and a lot simpler to make than they sound. Now the children can have fun playing with their fairies in the fairy house.
I’ve always been a bit iffy about book folding, I think it’s the librarian in me…which is silly because I’ve seen the amount of unloved books there are. It’s a fabulous craft for kids and I’m sure mine would love it. I especially love those fairies, they are adorable.
These look absolutely amazing. I love the idea of using old paperback books, you could choose their favourites for a special gift. I think my two would need a hand with the folding, is that difficult. I’d love to give this a try. I’ve pinned it for later
Wow, what a clever idea! This is so imaginative & turned out just beautiful. My kids would love making these – the fairy especially. Will have to give it a try.
I love the fairies! I was thinking of buying Sophie some more dolls for her dolls house but now I am thinking of making some. Thanks for the great tutorial.
Very cool. Though there’s always that little part of me that hates to see books sacrificed! The hedgehogs were cute too.
The fairy house is beautiful and all the embellishments look so pretty too. I love your little flowers and fairy, the whole scene is so well done. I bet the girls love them and well done Nanny for making the houses for them to decorate it looks like a great deal of patients is required for that part but so worth it